Jetzt profitieren wir auch davon, dass wir in dem Kapitel Firewall aktivieren den SSH Dienst selbst, anstelle eines Ports freigegeben haben. Die SSH Konfiguration können wir ändern ohne die Firewall umstellen zu müssen.
SSH Regeln in UFW überprüfen
Rufen wir zur Sicherheit die aktuellen Firewall Regeln ab:
__$ sudo ufw status verbose
Ausgabe:
Status: active
Logging: on (low)
Default: deny (incoming), allow (outgoing), disabled (routed)
New profiles: skip

To                         Action      From
--                         ------      ----
22/tcp                     ALLOW IN    Anywhere
22/tcp (v6)                ALLOW IN    Anywhere (v6)
SSH Port ändern
Erst ändern wir den Standard Port 22 vom SSH Dienst. Öffnen wir dazu die SSH Konfigurationsdatei:
__$ sudo nano /etc/ssh/sshd_config
Die Option Port kommentieren wir ein und stellen den Wert auf 22123:
Auszug aus /etc/ssh/sshd_config
...
Port 22123
...
Die vollständige /etc/ssh/sshd_config Datei sollte dann so aussehen:
/etc/ssh/sshd_config
#       $OpenBSD: sshd_config,v 1.103 2018/04/09 20:41:22 tj Exp $

# This is the sshd server system-wide configuration file.  See
# sshd_config(5) for more information.

# This sshd was compiled with PATH=/usr/bin:/bin:/usr/sbin:/sbin

# The strategy used for options in the default sshd_config shipped with
# OpenSSH is to specify options with their default value where
# possible, but leave them commented.  Uncommented options override the
# default value.

Include /etc/ssh/sshd_config.d/*.conf

Port 22123
#AddressFamily any
#ListenAddress 0.0.0.0
#ListenAddress ::

#HostKey /etc/ssh/ssh_host_rsa_key
#HostKey /etc/ssh/ssh_host_ecdsa_key
#HostKey /etc/ssh/ssh_host_ed25519_key

# Ciphers and keying
#RekeyLimit default none

# Logging
#SyslogFacility AUTH
#LogLevel INFO

# Authentication:

#LoginGraceTime 2m
#PermitRootLogin prohibit-password
#StrictModes yes
#MaxAuthTries 6
#MaxSessions 10

PubkeyAuthentication yes

# Expect .ssh/authorized_keys2 to be disregarded by default in future.
AuthorizedKeysFile     %h/.ssh/authorized_keys

#AuthorizedPrincipalsFile none

#AuthorizedKeysCommand none
#AuthorizedKeysCommandUser nobody

# For this to work you will also need host keys in /etc/ssh/ssh_known_hosts
#HostbasedAuthentication no
# Change to yes if you don't trust ~/.ssh/known_hosts for
# HostbasedAuthentication
#IgnoreUserKnownHosts no
# Don't read the user's ~/.rhosts and ~/.shosts files
#IgnoreRhosts yes

# To disable tunneled clear text passwords, change to no here!
PasswordAuthentication no
#PermitEmptyPasswords no

# Change to yes to enable challenge-response passwords (beware issues with
# some PAM modules and threads)
ChallengeResponseAuthentication no

# Kerberos options
#KerberosAuthentication no
#KerberosOrLocalPasswd yes
#KerberosTicketCleanup yes
#KerberosGetAFSToken no

# GSSAPI options
#GSSAPIAuthentication no
#GSSAPICleanupCredentials yes
#GSSAPIStrictAcceptorCheck yes
#GSSAPIKeyExchange no

# Set this to 'yes' to enable PAM authentication, account processing,
# and session processing. If this is enabled, PAM authentication will
# be allowed through the ChallengeResponseAuthentication and
# PasswordAuthentication.  Depending on your PAM configuration,
# PAM authentication via ChallengeResponseAuthentication may bypass
# the setting of "PermitRootLogin without-password".
# If you just want the PAM account and session checks to run without
# PAM authentication, then enable this but set PasswordAuthentication
# and ChallengeResponseAuthentication to 'no'.
UsePAM yes

#AllowAgentForwarding yes
#AllowTcpForwarding yes
#GatewayPorts no
X11Forwarding yes
#X11DisplayOffset 10
#X11UseLocalhost yes
#PermitTTY yes
PrintMotd no
#PrintLastLog yes
#TCPKeepAlive yes
#PermitUserEnvironment no
#Compression delayed
#ClientAliveInterval 0
#ClientAliveCountMax 3
#UseDNS no
#PidFile /var/run/sshd.pid
#MaxStartups 10:30:100
#PermitTunnel no
#ChrootDirectory none
#VersionAddendum none

# no default banner path
#Banner none

# Allow client to pass locale environment variables
AcceptEnv LANG LC_*

# override default of no subsystems
Subsystem sftp  /usr/lib/openssh/sftp-server

# Example of overriding settings on a per-user basis
#Match User anoncvs
#       X11Forwarding no
#       AllowTcpForwarding no
#       PermitTTY no
#       ForceCommand cvs server
Nach dem speichern starten wir den SSH Dienst wieder neu:
__$ sudo systemctl restart ssh
Wir müssen der Firewall noch den neuen Port mitteilen:
__$ sudo ufw allow 22123
Den alten Port widerufen wir auch gleich:
__$ sudo ufw deny 22
__$ sudo ufw deny 22/tcp
Schauen wir uns die Regelliste nochmal an:
__$ sudo ufw status
Ausgabe:
Status: active

To                         Action      From
--                         ------      ----
22123                      ALLOW       Anywhere
22                         DENY        Anywhere
22123 (v6)                 ALLOW       Anywhere (v6)
22 (v6)                    DENY        Anywhere (v6)
Wie die einzelnen Regeln gelöscht werden, kann unter ufw nachgeschlagen werden.
Ab jetzt müssen wir bei der Anmeldung den neuen Port mitgeben.
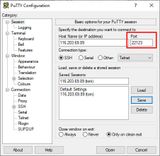
Unter Windows mit PuTTY
In PuTTY stellen wir dazu den Port um. Bestenfalls laden wir unsere Session, ändern den Port und speichern die Session auch wieder ab:
Unter Windows mit Cygwin
Bei Cygwin ergänzen wir den Parameter -p und die Portnummer:
__$ ssh tom@116.203.69.89 -p 22123 -i /cygdrive/d/linux-server/keys/private-key
Unter Mac und Linux im Terminal
Wir ergänzen den Parameter -p und die Portnummer. Der vollständige SSH Befehl sieht im Terminal dann so aus:
__$ ssh tom@116.203.69.89 -p 22123 -i ~/linux-server/id_rsa